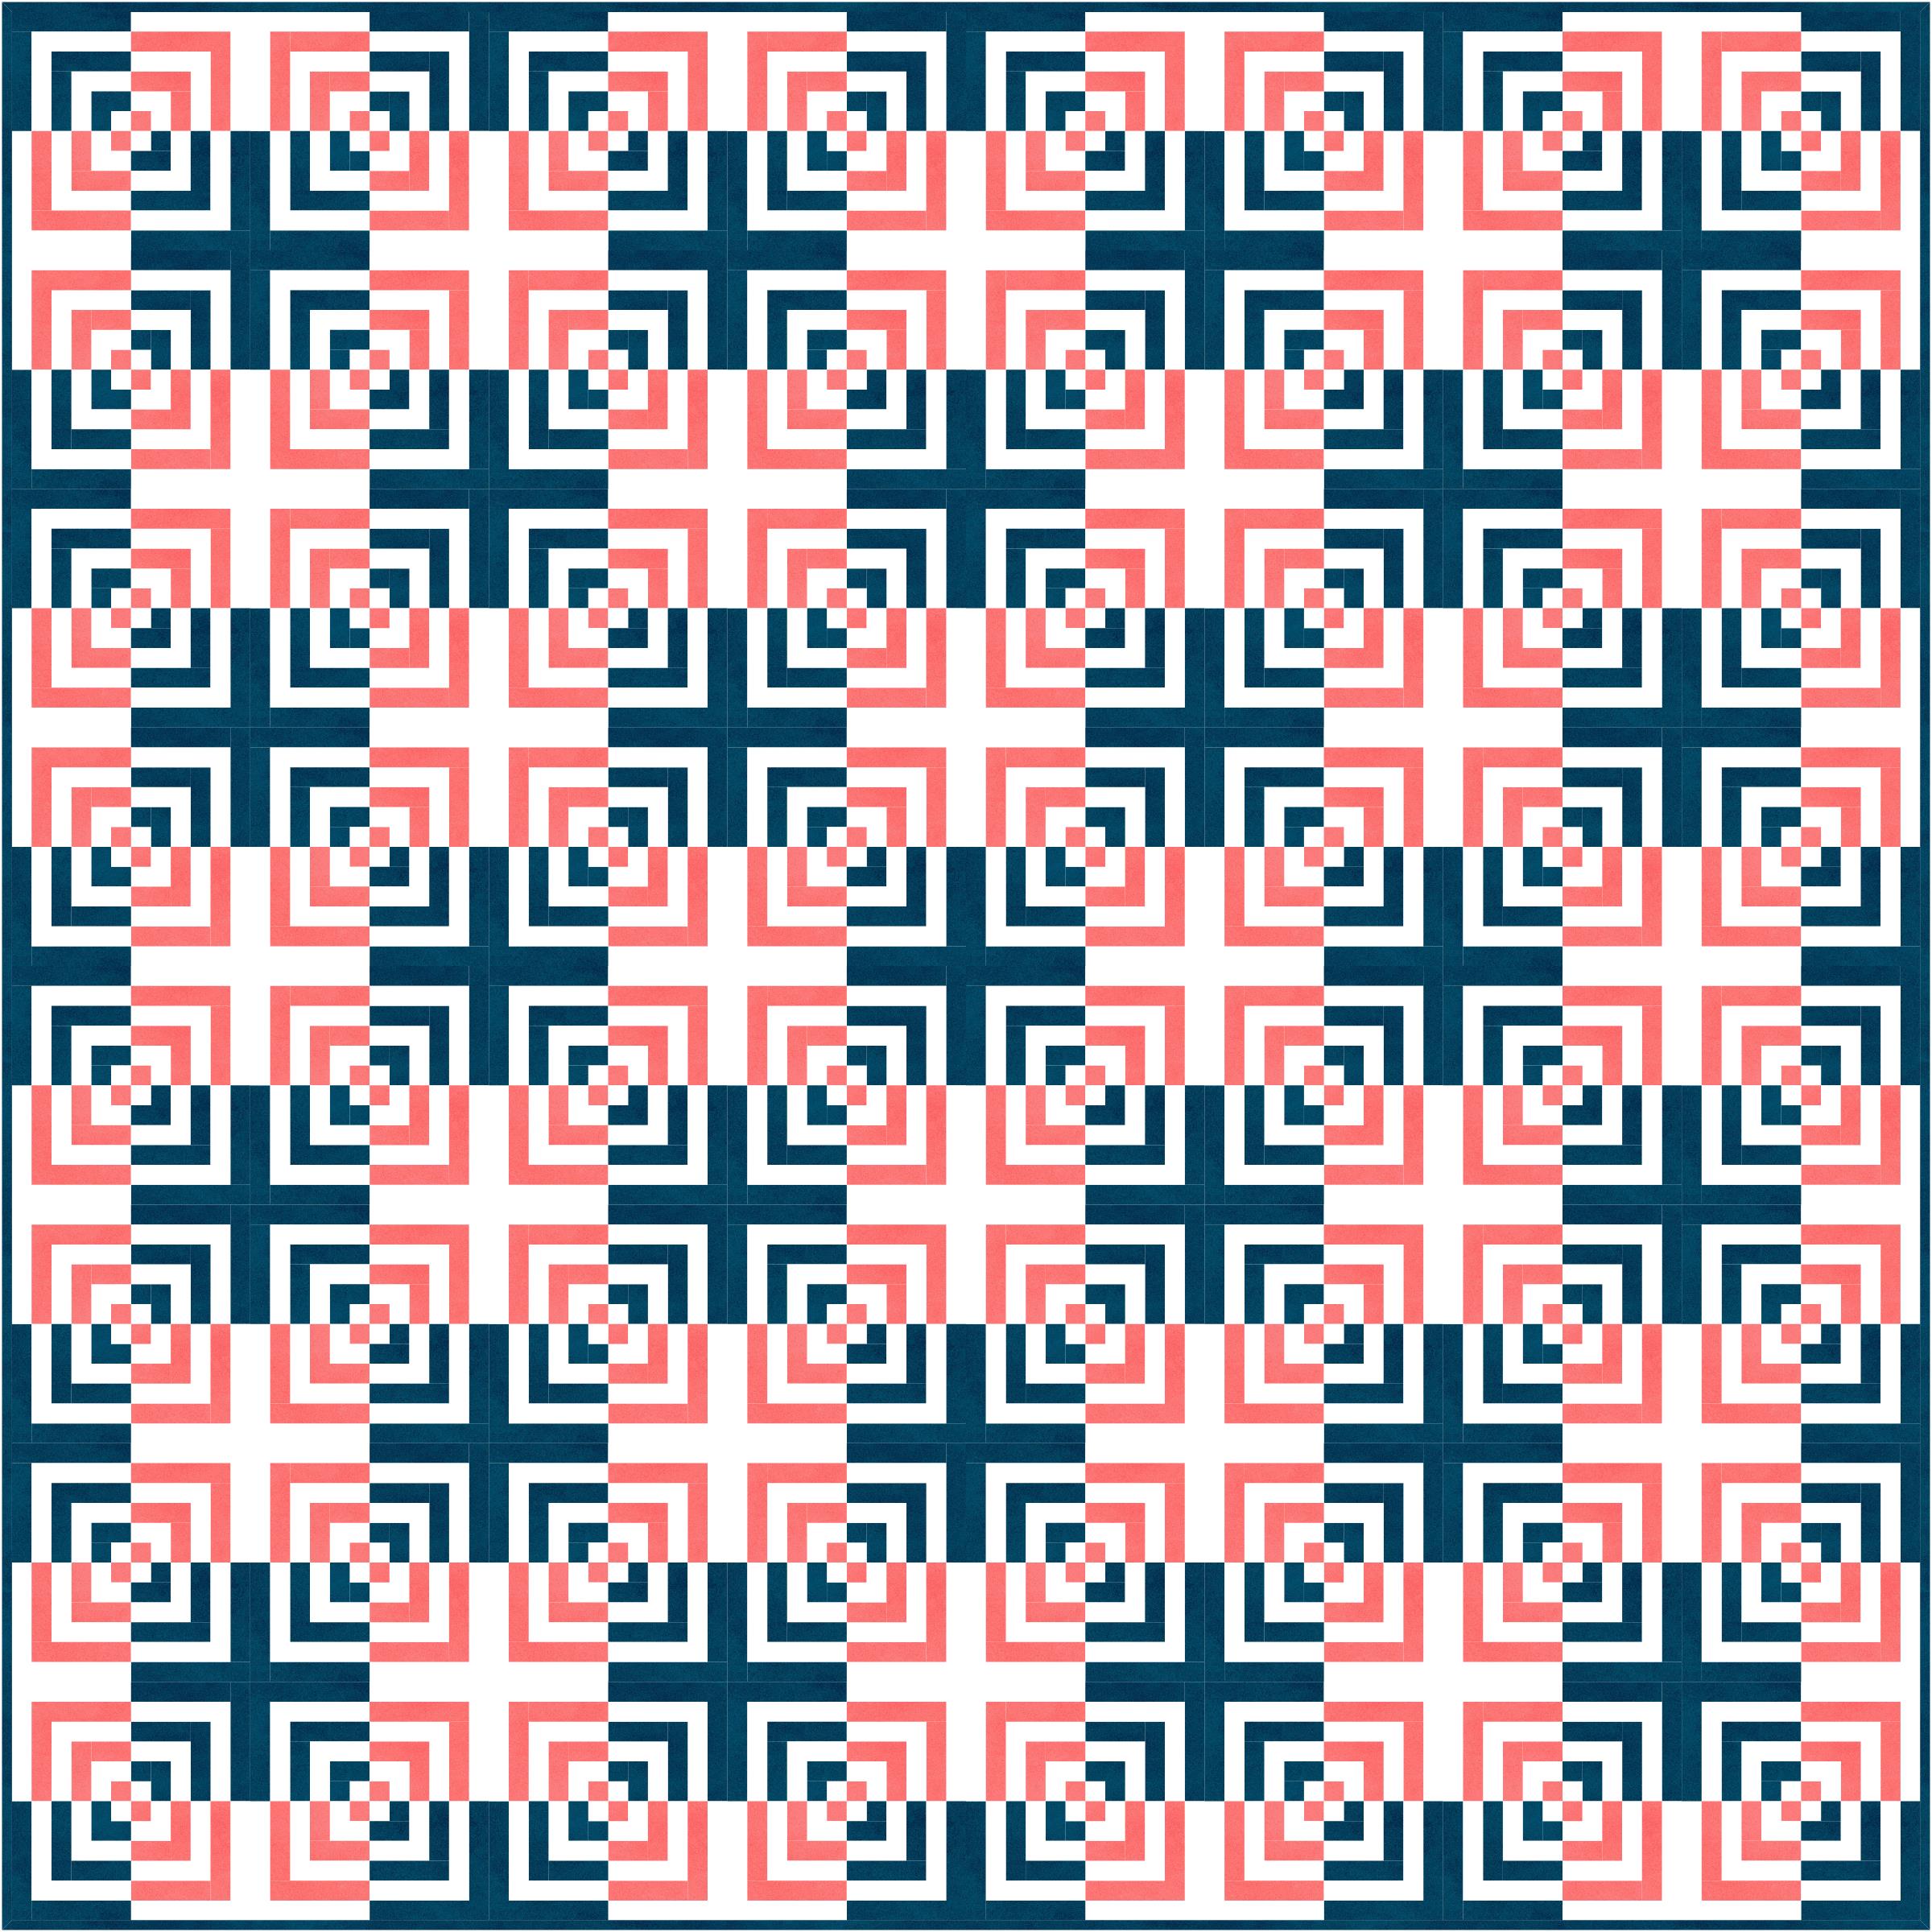
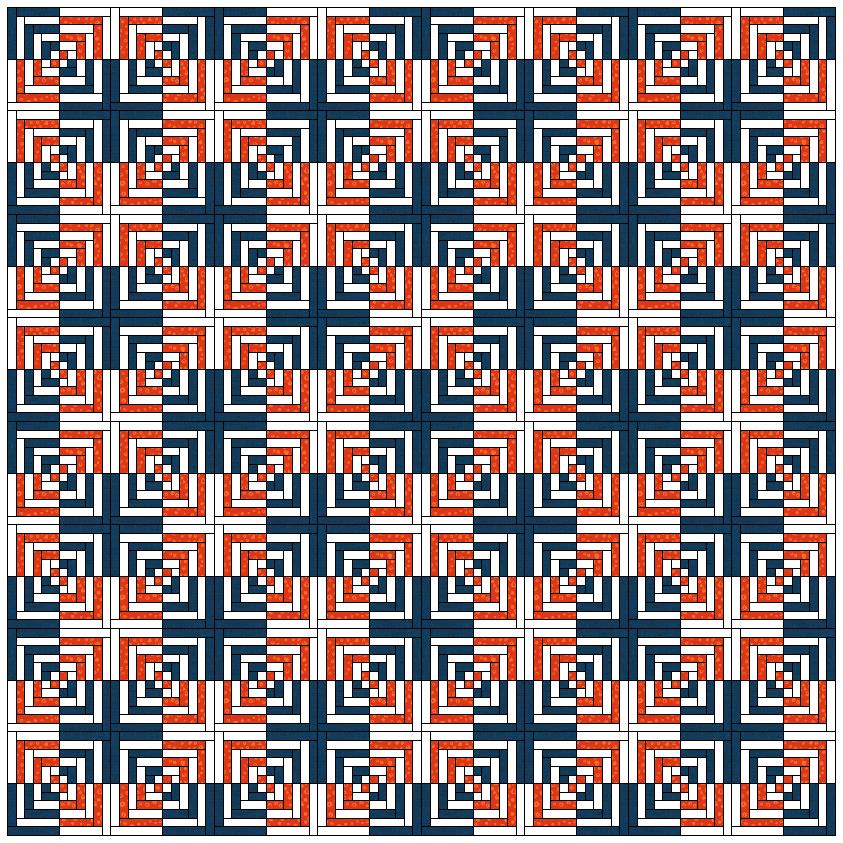
As part of the Quilt 2018 – Optical Illusion Project we offer this head-spinning pattern for inspiration. Be sure to check out the project details. This time, make the Bento Box Illusion quilt!
Show off your progress or any of your latest projects in our show and tell group, the AQS Project Parade Facebook Group. We love to see what you are up to!
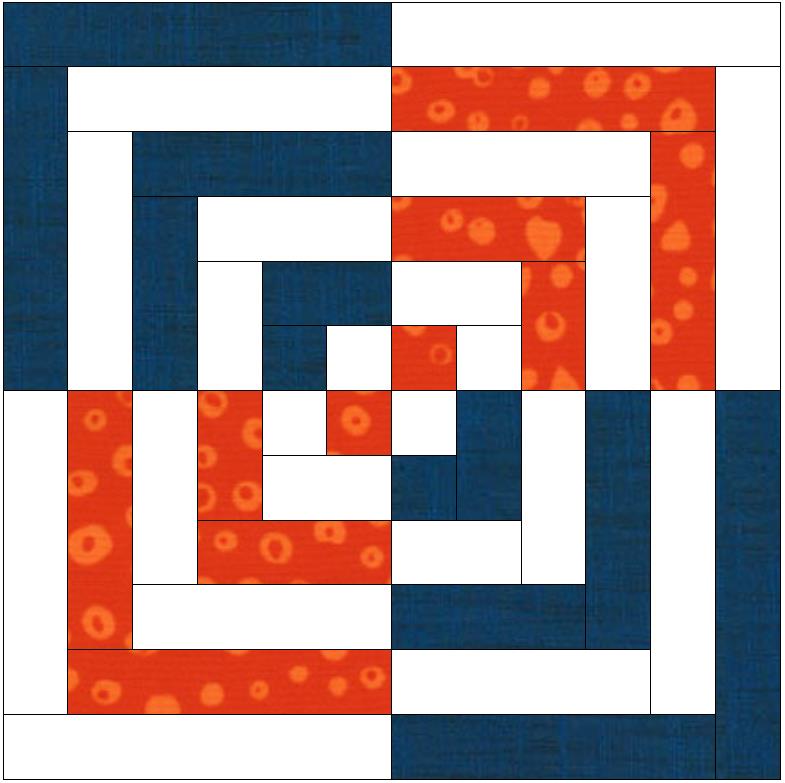
AQS Bento Box Illusion Quilt
48″ x 48″
by Betsey Langford
Fabric Requirements:
Blue: 1 1/2 yards
Orange: 1 1/4 yards
White: 2 1/3 yards
Cutting Instructions:
From the blue fabric, cut 128 pieces of each of the following:
3 1/2″ x 1″ rectangles
3″ x 1″ rectangles
2 1/2″ x 1″ rectangles
2″ x 1″ rectangles
1 1/2″ x 1″ rectangles
1″ x 1″ squares
From the orange fabric, cut 128 pieces of each of the following:
3″ x 1″ rectangles
2 1/2″ x 1″ rectangles
2″ x 1″ rectangles
1 1/2″ x 1″ rectangles
1″ x 1″ squares
From the white fabric, cut:
(128) 3 1/2″ x 1″ rectangles
And from the white fabric, cut 256 pieces of each of the following”
3″ x 1″ rectangles
2 1/2″ x 1″ rectangles
2″ x 1″ rectangles
1 1/2″ x 1″ rectangles
1″ x 1″ squares

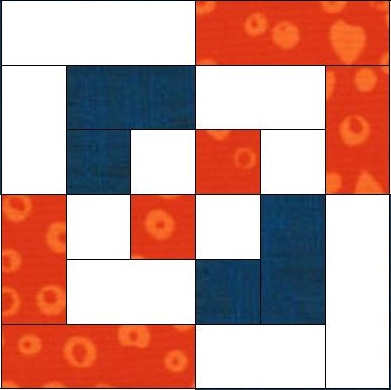
Block Assembly:
Step 1:
Sew a white 1″ square to an orange 1″ square. Repeat this process. Then sew the two units together to make a four patch. Make 64.

Step 2:
Sew a white 1″ square to a blue 1″ square. Then sew this to the left side of the four patch unit made in step 1.
Sew a white 1 1/2″ x 1″ rectangle to a blue 1″ square. Then sew this to the bottom of the four patch unit.
Sew a blue 1 1/2″ x 1″ rectangle to a white 1″ square. Then sew this to the right side of the four patch unit.
Sew a blue 1 1/2″ x 1″ rectangle to a white 1 1/2″ x 1″ rectangle. Then sew this to the top of the four patch unit.
Continue this process, adding round one to the remaining blocks.

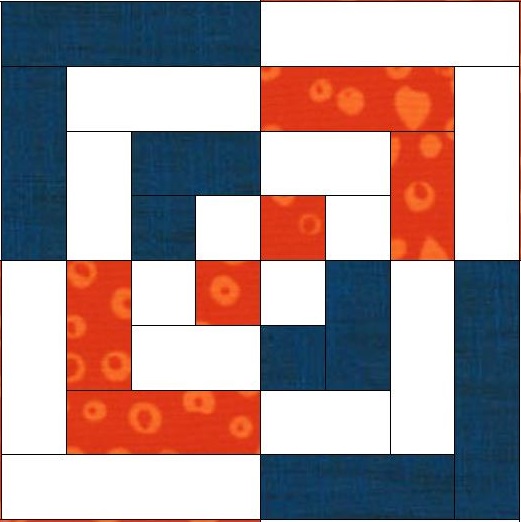
Step 3:
Sew a white 1 1/2″ x 1″ rectangle to an orange 1 1/2″ x 1″ rectangle. Then sew this to the left side of the four patch unit added to in step two.
Sew an orange 2″ x 1″ rectangle to a white 1 1/2″ x 1 rectangle. Then sew this to the bottom of the four patch unit.
Sew a white 2″ x 1″ rectangle to an orange 1 1/2″ x 1″ rectangle. Then sew this to the right side of the four patch unit.
Sew a white 2″ x 1″ rectangle to an orange 2″ x 1″ rectangle. Then sew this to the top of the four patch unit.
Continue this process, adding round two to the remaining blocks.
Step 4:
Sew a white 2″ x 1″ rectangle to a blue 2″ x 1″ rectangle. Then sew this to the left side of the four patch unit added to in step three.
Sew a white 2 1/2″ x 1″ rectangle to a blue 2″ x 1 rectangle. Then sew this to the bottom of the four patch unit.
Sew a white 2″ x 1″ rectangle to a blue 2 1/2″ x 1″ rectangle. Then sew this to the right side of the four patch unit.
Sew a white 2 1/2″ x 1″ rectangle to a blue 2 1/2″ x 1″ rectangle. Then sew this to the top of the four patch unit.
Continue this process, adding round three to the remaining blocks.
Step 5:
Sew a white 2 1/2″ x 1″ rectangle to an orange 2 1/2″ x 1″ rectangle. Then sew this to the left side of the four patch unit added to in step four.
Sew an orange 3″ x 1″ rectangle to a white 2 1/2″ x 1 rectangle. Then sew this to the bottom of the four patch unit.
Sew a white 3″ x 1″ rectangle to an orange 2 1/2″ x 1″ rectangle. Then sew this to the right side of the four patch unit.
Sew a white 3″ x 1″ rectangle to an orange 3″ x 1″ rectangle. Then sew this to the top of the four patch unit.
Continue this process, adding round four to the remaining blocks.
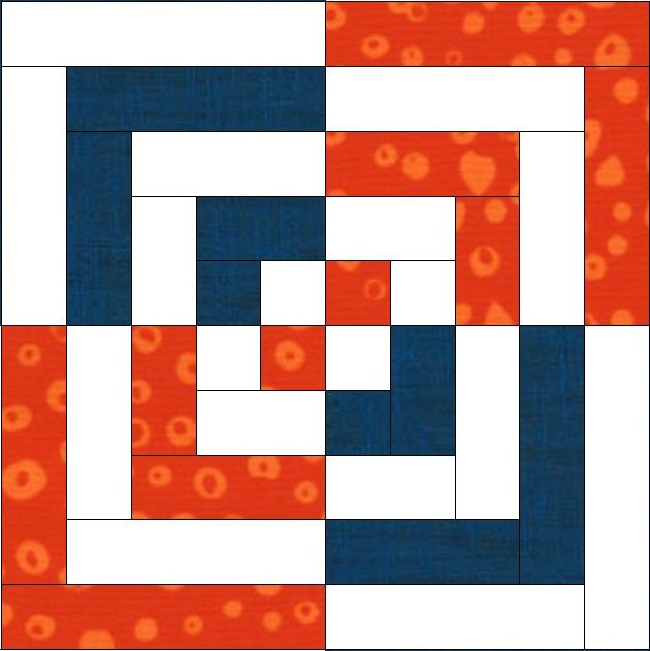
Step 6: Sew a white 3″ x 1″ rectangle to a blue 3″ x 1″ rectangle. Then sew this to the left side of the four patch unit added to in step five.
Sew a white 3 1/2″ x 1″ rectangle to a blue 3″ x 1 rectangle. Then sew this to the bottom of the four patch unit.
Sew a white 3″ x 1″ rectangle to a blue 3 1/2″ x 1″ rectangle. Then sew this to the right side of the four patch unit.
Sew a white 3 1/2″ x 1″ rectangle to a blue 3 1/2″ x 1″ rectangle. Then sew this to the top of the four patch unit.
Continue this process, adding round five to the remaining blocks.
Quilt Assembly:
Sew 8 blocks into a row. Carefully check the pattern for orientation.
Continue until all rows are sewn. Sew the rows together to complete the quilt top.
Layer the backing and batting, right sides together, on the front of the quilt. Sew around the edges leaving a hole for turning on one side.
Turn the quilt right side out taking special care at the corners.
Slip stitch the turning hole closed.
Quilt as desired.
Show off your creations, connect with other quilters, and get inspired!
Join us in the AQS Project Parade Facebook Group and piece along with us!
Members get even more…
AQS Members can access hundreds of patterns and all past issues of American Quilter at any time!
Find quilt along series like Forever & A Day, 30 Days of Birds and more.

Not a member? Join today!
I love this Bento Box block. How much material/# of blocks would I need to make a top for a 16×16″ pillow?
this looks so hard to do – when looking @ it – but it is not – love it HAHAHAHA – thanks so very much
I love how complete and clear your directions are! Thank you.
Wouldn’t this be much simpler to make (fewer cuts) just making each color set as you would a log cabin block and then cutting them in to fourths and repiecing them? Or am I missing something?