
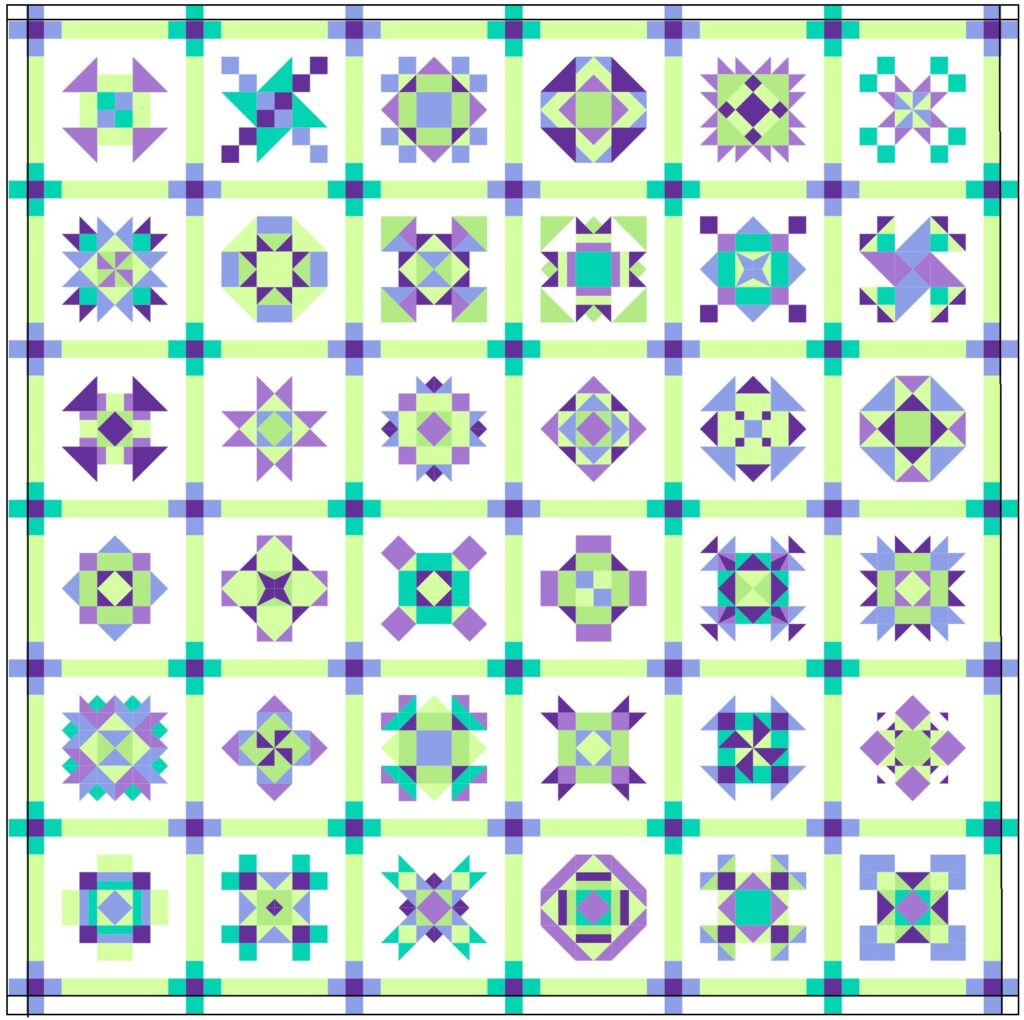
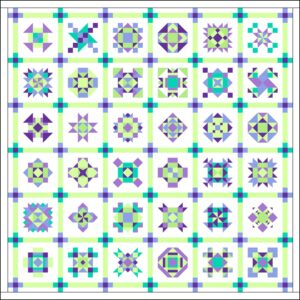
2019 AQS Paducah Sewalong
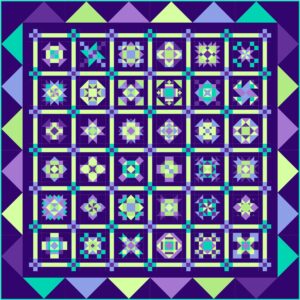
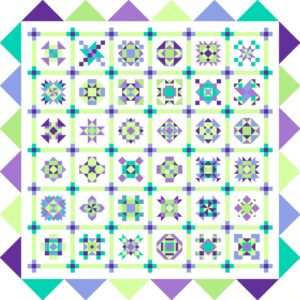
Spring 2019 Sampler

70″ x 70″
Introducing the Paducah Sewalong Spring 2019 Sampler! We love the Paducah Sewalong Double Wedding Ring Sampler. It’s a once-in-a-lifetime quilt. If you’d like to check it out, click here.
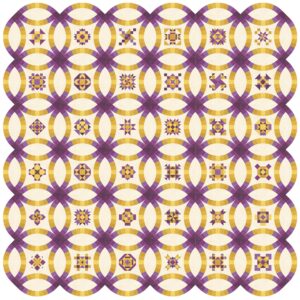
But if a Double Wedding Ring isn’t for you, we’ve got you! The Spring 2019 Sampler is a beginner-friendly option for setting the 36 Paducah Sewalong blocks. Each block has a frame that is sized once added so every block comes out the right size without losing points and it works if a block comes out large or small.

You can even take it a totally different direction with a dark background!
Below are fabric requirements and setting instructions. The blocks are the exact same as for the Double Wedding Ring Sampler, and we’ve marked the fabric requirements for the Spring 2019 Sampler with the abbreviations used for the Double Wedding Ring Sampler to help you relabel patterns if you choose different fabrics and colors.
Fabric Requirements
(DP) Dark Purple American Made Brand – 7/8 yard
(P) Purple American Made Brand – 7/8 yard
(LP) Periwinkle American Made Brand – 7/8 yard
(DY) Dark Turquoise American Made Brand – 2/3 yard
(Y) Lime American Made Brand – 7/8 yard
(LY) Light Lime American Made Brand – 1 1/2 yards
American Made Brand White Background – 4 1/2 yards
Binding – 5/8 yard
Backing – 4 2/3 yards

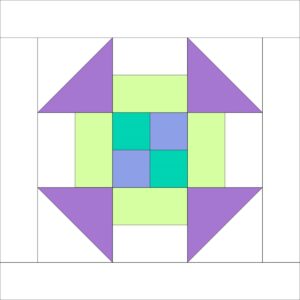
36 Sampler Blocks
6″ x 6″ finished block size
Click here to find all 36 block patterns in one place. During the sewalong, a new block is posted each day by 9 a.m. Central.
Use the abbreviations in front of the fabrics in the Fabric Requirements for color placement relabeling. For example, every place in a block pattern that’s marked as LY or light yellow, use Light Lime.
Setting Cutting Instructions
From the white background fabric, cut:
(6) 1 ½″ x Width of Fabric (WOF) strips, subcut into:
(24) 1 ½″ x 8 ½″ rectangles
(4) 1 ½″ x 1 ½″ squares
(12) 1 ¾″ x WOF strips, subcut into:
(72) 1 ¾″ x 6 ¾″ rectangles
(18) 1 ¾″ x WOF strips subcut into:
(72) 1 ¾″ x 8 ¾″ rectangles
(6) 2″ x WOF strips, sewn together and subcut into:
(2) 2″ x 57 ½″ strips
(2) 2″ x 60 ½″ strips
(1) 5 ½″ x WOF subcut into:
(4) 5 ½″ x 5 ½″ squares
(6) 6″ x WOF strips, subcut into:
(24) 6″ x 6″ squares
From the light lime fabric, cut:
(1) 11 ½″ x 11 ½″ squares
(14) 1 1/2″ x WOF strips, subcut into:
(84) 1 ½″ x 6 ½″
From the lime fabric, cut:
(1) 11 ½″ x 11 ½″ square
From the dark turquoise fabric, cut:
(1) 11 ½″ x WOF strip, subcut into:
(1) 11 ½″ x 11 ½″ square
(96) 1 ½″ x 1 ½″ squares
From the periwinkle fabric, cut:
(1) 11 ½″ x WOF strip, subcut into:
(1) 11 ½″ x 11 ½″ square
(96) 1 ½″ x 1 ½″ squares
From the purple fabric, cut:
(1) 11 ½″ x 11 ½″ square
From the dark purple fabric, cut:
(1) 11 ½″ x WOF strip, subcut into:
(1) 11 ½″ x 11 ½″ square
(49) 1 ½″ x 1 ½″ squares
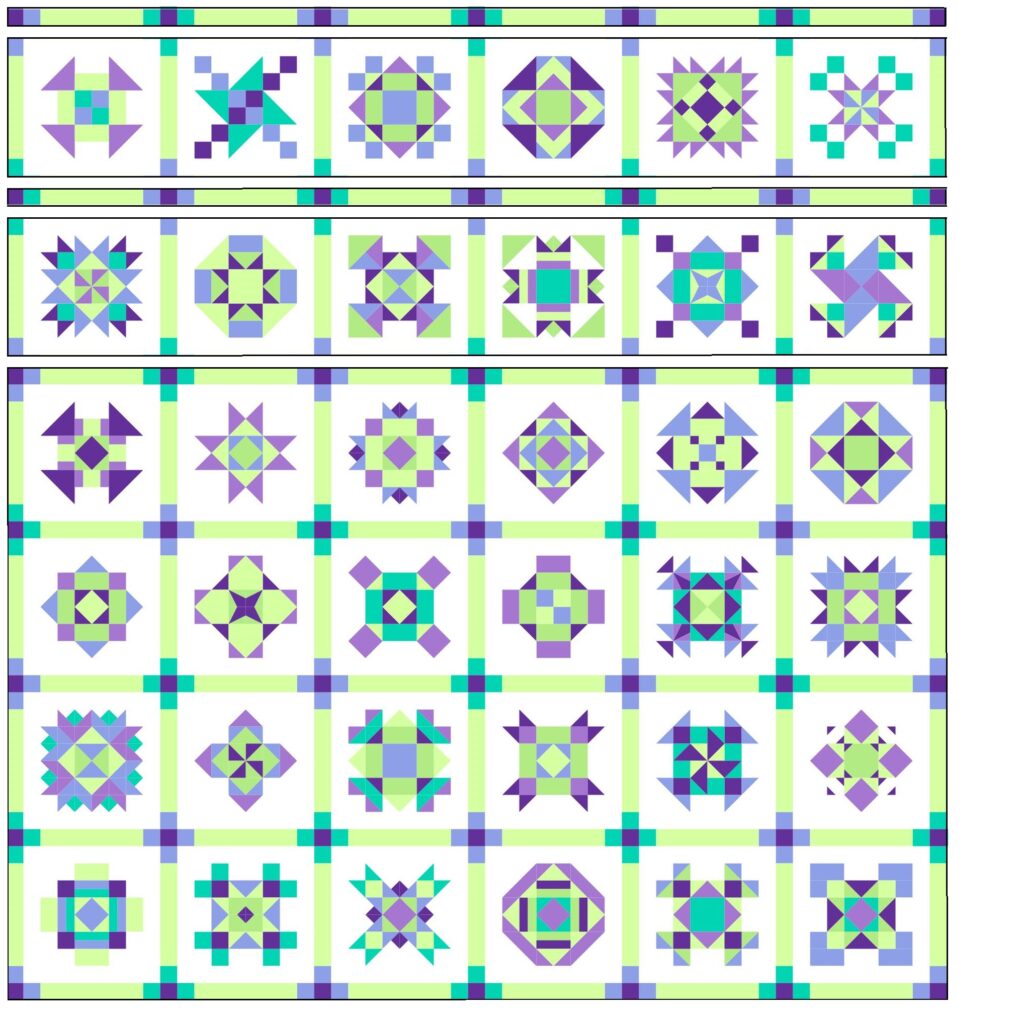
Quilt Assembly
Block Frames
Sew a background 1 3/4″ x 6 3/4″ rectangle to the left and right sides of a block. Trim the sides even to the block.
Sew a background 1 3/4″ x 8 3/4″ rectangle to the top and bottom of the block. Measure 4 1/4″ from the center of the block and trim. Repeat on all sides to size the block with the frame to 8 1/2″ x 8 1/2″ unfinished.
See the video below to watch this method in action.
Repeat for all 36 blocks.
Sashing
Sew a periwinkle 1 1/2″ square to one end of a light lime 1 1/2″ x 6 1/2″ rectangle. Sew a dark turquoise 1 1/2″ square to the other end of the light lime rectangle. Repeat to make 84 sashing strips.
Using sashing strips and dark purple 1 1/2″ squares, make 4 rows as shown below. Row measures 1 1/2″ x 55 1/2″ unfinished.
![]()
Using sashing strips and the remaining dark purple 1 1/2″ squares, make 3 rows as shown below. Row measures 1 1/2″ x 55 1/2″ unfinished.
![]()
Sew the remaining sashing strips to the sides of the blocks in rows; use the guide below to color and block placement. Sew the sashing rows to block rows as shown below. Quilt center measures 55 1/2″ x 55 1/2″ unfinished.
Sashing Border
Sew a row using background 1 1/2″ x 8 1/2″ rectangles and periwinkle and dark turquoise 1 1/2″ squares. Row measures 1 1/2″ x 55 1/2″ unfinished, make 4.
![]()
Sew a background 1 1/2″ square to both ends of a row. Rows measure 1 1/2″ x 57 1/2″ unfinished, make 2.
![]()
Sew the rows without background squares on the end to the left and right side of the quilt center. Then sew the remaining rows to the top and bottom of the quilt to complete the sashing border. Quilt measures 57 1/2″ x 57 1/2″ unfinished with sashing border.
Inner Border
Note: If your quilt doesn’t measures smaller than 57 1/2″ square after adding the sashing border, cut the (6) 2″ x WOF strips wide enough to size the quilt. The quilt needs to be 60 1/2″ square after adding the inner border.
Sew together the (6) 2″ x Width of Fabric strips into one continuous piece of fabric. Measure the quilt on the left and right side and through the middle. Add the three measurements and divide by 3 to average these measurements, this average measurement should be approximately 57 1/2″ long. Cut two strips that average measurement length. Sew the strips to the left and right side of the quilt center.
Repeat the measurement step for the top, bottom and middle of the quilt and average. Average should be approximately 60 1/2″ long. Cut two strips this measurement length and sew to the top and bottom of the quilt center.
If your quilt is larger than 60 1/2″ at this step, trim it to size. This is important for adding the Flying Geese border in the next step.
Flying Geese Border
Mark the wrong side of the background 6″ squares in half diagonally once and a quarter inch from both sides of the marked center line.
Lay two marked background squares over a dark purple 11 1/2″ square in diagonally opposite corners. Sew on the marked quarter inch lines as shown below.
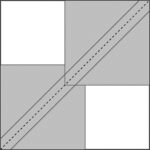
Cut apart on the marked center line. Press. There will be two units that look somewhat like a fox head. Lay a marked background square over the dark purple triangle and sew on the quarter inch lines as shown below. Repeat on the other “fox head.”
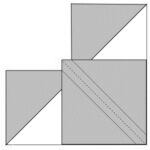
Cut apart and press. Repeat with the remaining 11 1/2″ squares in purple, periwinkle, dark turquoise, lime, and light lime to make 4 Flying Geese of each color.
If you’d like to see this method in action, watch the video below.
Trim the Flying Geese to 5 1/2″ x 10 1/2″ unfinished as demonstrated in the video below.
Using one of each color Flying Geese, sew together a row of six Flying Geese as shown below. Row measures 5 1/2″ x 60 1/2″ unfinished, make 4.

Sew a Flying Geese Border row to the left and right side of the quilt with the peaks pointing out.
Using the background 5 1/2″ squares, sew one on both ends of the two remaining Flying Geese rows. Sew these rows to the top and bottom of the quilt with the peaks pointing out.
![]()
Quilt measures 70 1/2″ x 70 1/2″ unfinished.
Once the top is done, layer with batting and backing and quilt as desired. Bind using preferred method.
Show off your progress, connect with other quilters, get ideas, motivation and more!
Join us in the AQS Project Parade Facebook Group and piece along with us!
Members get even more…
Not a member? Join today!
am wondering the name of the quilt that is behind the video “how to trim flying geese to size with Emily” and “video “how to make no waste flying geese with Emily” . It is stunning. Is there a chance to get the pattern
Hello Annette! I’m so glad you like it! The quilt is Medusozoa and we have a few ways you can get it. The pattern was in the January 2019 issue of AQ Magazine.
AQS member can always access past issues at aqsquilt.com and here’s the member link to Medusozoa: https://www.aqsquilt.com/medusozoa/
You can also order back issues of AQ Magazine, and here’s the link to the January 2019 issue: https://shop.americanquilter.com/14236-american-quilter-january-2019-digital.html
And finally, there’s a kit. https://shop.americanquilter.com/14841-medusozoa-quilt-kit.html
Have a great day making!
Emily