Simplify your Flying Geese construction with this no-waste method. Watch as Emily takes you step by step through the process. Be sure to catch the second video showing you how to size your Flying Geese units.
Try this simple technique to make four Flying Geese at once!
Trim them to the perfect size every time!
Here are the written instructions as you might see them in the pattern:
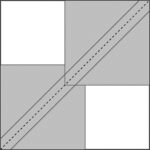
Mark four red 1 5/8″ squares in half diagonally once. Lay two red marked squares over a white 2 1/2″ square in diagonally opposite corners. Sew a quarter inch from the marked line on both sides. Cut apart and press.
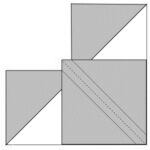
Lay a red square over the corner of the white triangle. Sew a quarter inch from the marked line on both sides. Cut apart and press. Repeat with the other white triangle.
Trim Flying Geese to 1″ x 1 1/2″ rectangle. Make 4 Flying Geese.
Be sure to check out more great tutorials like these at QuiltTV!
Excellent presentation She is clear and precise and easy to follow! I can make these without hesitation! Thanks
Excellent Job……………. I really appreciate from you
Tnx