
Let’s make an Embroidered Wall Hanging!
It’s the tenth week and the ninth project of Machine Embroider Your Life from American Quilter’s Society and EverSewn! We’re so excited to bring you nine great machine embroidery projects to make in the following weeks. There’s lots of fun in store. This week we’re beginning our embroidered wall hanging. Let’s get started!
Supplies
- 120 x 180 mm Embroidery Hoop
- 14/90 Machine Embroidery Needle
- Water Soluble Topping
- Spray Baste Adhesive
- Ruler
- Scissors
- Seam Ripper
- Craft Clips
- Pencil
- Iron
- Freezer Paper for applique
- Embroidery Thread(s)
- Background fabric
- Applique fabric
- Batting
Project Planning
We are making a quilt-as-you-go (QAYG) wall hanging using blocks. This method is made without the backing during the quilting. This allows us to embroider, applique, and quilt all at once without any of the thread starting and stopping showing through to the back. It works best on a small scale because the backing is attached to the quilt front later by stitching around the blocks, so the larger the blocks, the larger the area of the backing that will be unquilted. Using a batting that can have greater distances between areas of quilting can allow for larger blocks.
With that in mind, choose designs and sizes you like accordingly. We chose designs that fit easily inside a 5″ finished block size and used a batting that can be quilted up to 6″ apart. We made a wall hanging with nine 5″ blocks for a 15″ x 15″ wall hanging.
Quilt Sandwich Preparation
To begin, cut a piece of background fabric and batting large enough to hoop. Spray the batting with spray baste adhesive and lay the fabric over it, right side up. Smooth out any bubbles or wrinkles and allow the adhesive to dry.
Next, cut a piece of topping large enough to hoop. We are using the topping to protect the batting from being roughed up by the feed dogs in the machine and protecting the machine from getting a lot of loose fibers in it from the batting.
Hooping
Loosen the nut of the embroidery hoop to allow plenty of space to hoop the quilt sandwich. Place the outer hoop on a hard work surface.
Layer the topping and then the quilt sandwich over the outer hoop. Place the inner hoop on top of the quilt sandwich and look at the grain of the fabric to ensure the material is lined up straight.
Press the inner hoop into the outer hoop, close the clamp, and tighten the nut.
Install the embroidery hoop in the machine.
Design
If you’re following along on a machine other than the Sparrow X, select a design and arrange the design following your machine’s editing software. We used three coordinating designs, two of which feature applique. The possibilities are pretty endless with this project. Use quilting designs, applique designs, embroidery motifs. Play around to find what you like!
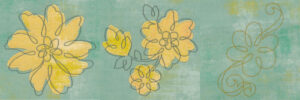
Couture Flower 1, Floral Couture 5, Couture Background Swirl 3
Open the EverSewn Pro app on your smart device.
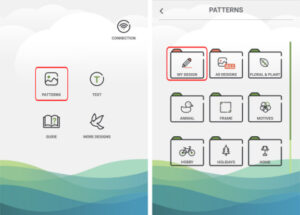
Select the Pattern tab. The design we make in the video is in My Design folder.
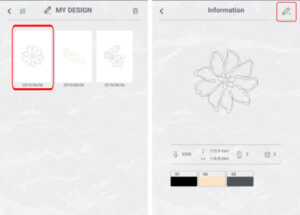
Select the design you want to make. The app takes you to an information page. Click on the pencil button in the upper right corner to send it to the editing screen.

We want the embroidery to be centered in the hoop. To do that, tap the Move button in the bottom sliding menu. Select the embroidery design by tapping on it, then click the button that looks like four arrows all pointing towards the center.
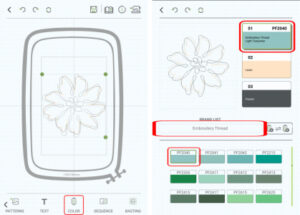
Finally, you can change the thread color to help you track your color placement. Tap the Color button in the bottom sliding menu. Select which thread color you’d like to change from the threads listed to the upper right. Then tap the drop down menu to choose a thread/color line. Finally, scroll and select the color.
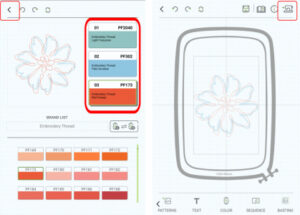
Repeat this process for all the threads. Quick note. See how Thread 1 and Thread 2 are slightly different colors? I’ll be using the same thread in my machine for both layers, but keeping them different colors helps me track my progress and ensures my machine will alert me of the transition between Thread 1 and Thread 2.
Applique Preparation
If the design you selected includes applique, follow any sewing instructions that come with the design for the best execution.
We covered applique techniques that are tacked down and then cut out previously.
For designs that call for the applique to be cut out and then tacked/attached, here’s a helpful technique for accurate cutting.
Use a piece of freezer paper and a pencil to trace the motif to be appliqued using the template included in the design. Trace onto the paper size of the freezer paper.
Cut out roughly around the shape. Then place the freezer paper shiny side down onto the right side of the applique fabric. Press with a warm iron to temporarily adhere the paper to the fabric. Use your iron to smooth out any bubbles.
Then, simply cut out the fabric and paper following the marked lines. Leave the paper on to continue to ensure the stability of the fabric. Without the paper protecting, it can become warped and is harder to handle.
Stitchout
With the hoop installed, the design loaded, and the applique pieces prepared, we’re ready to begin the stitchout.
Start the machine stitching through the placement stitch. When it finishes, carefully remove the hoop from the machine.
Use a little spray baste on the back of the applique piece to get it sticky, and then place the applique piece over the outline of the placement stitch. Remove the freezer paper after the initial placement and make any final adjustments.
Once satisfied, reinstall the hoop in the machine and continue the stitchout. Follow any and all thread changes and machine prompts until the stitchout is complete.
Finishing Touches
Once the stitchout is completed, remove the hoop from the machine and unhoop the completed quilt sandwich.
Using a seam ripper to get you started, tear away the topping from the back. It is good to get all the topping off, but if a little stays in the stitched areas, it is not going to hurt a thing.
Repeat this process to make as many blocks as you would like for your wall hanging!
Keep the fun going!
Join us in the AQS Project Parade Facebook Group to show off your creations!
Members get even more…
AQS Members can access hundreds of patterns and digital issues of American Quilter at any time!
Find quilt along series like Forever & A Day, 30 Days of Birds and more.

Not a member? Join today!
0 Comments for “Embroider Your Life: Let’s Make a Wall Hanging!”