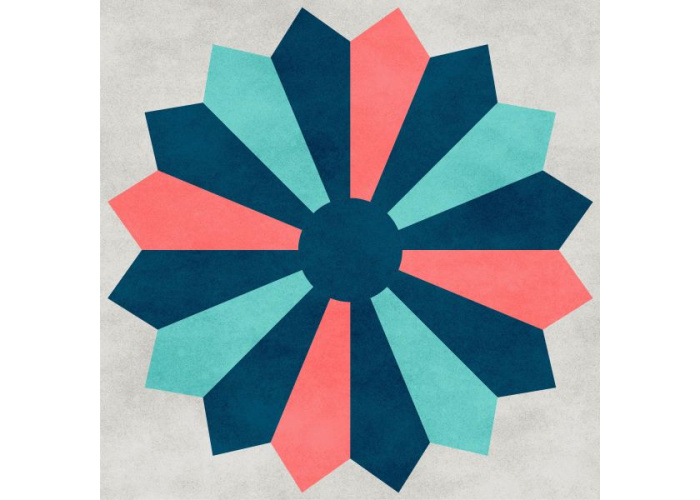

Welcome to Block 2019! We’re exploring classic quilt blocks all year, and the eighth block is Dresden Plate. This is a fun block with a neat construction technique.
Fabric Requirements:
Gray (Includes quilt-as-you-go backing) — 3/8 yard
Aqua — 1/8 yard
Dark Blue — 1/4 yard
Coral — 1/8 yard
Batting — 12″ x 12″ (For quilt-as-you-go method only)
Cutting Instructions:
From the gray fabric, cut:
(1) 13″ x 13″ (larger is also fine)
From the aqua fabric, cut:
(4) Wedges (see Template), approximate size per piece is 3″ x 5 1/4″
From the dark blue fabric, cut:
(8) Wedges (see Template), approximate size per piece is 3″ x 5 1/4″
(1) Circle (see Template), approximate size needed is 3 1/4″ x 3 1/4″
From the coral fabric, cut:
(4) Wedges (see Template), approximate size per piece is 3″ x 5 1/4″
CLICK HERE to download the Dresden Plate Cutting Templates
Cutting Help
Use the Dresden Plate Template to cut out wedges and a circle. Try tracing the template onto freezer paper and then ironing the paper to your fabric. Cut out on the marked lines of the freezer paper. Then simply peel the paper away for neatly cut pieces.
This method is also great for fussy cutting!
Assembly:
Wedges
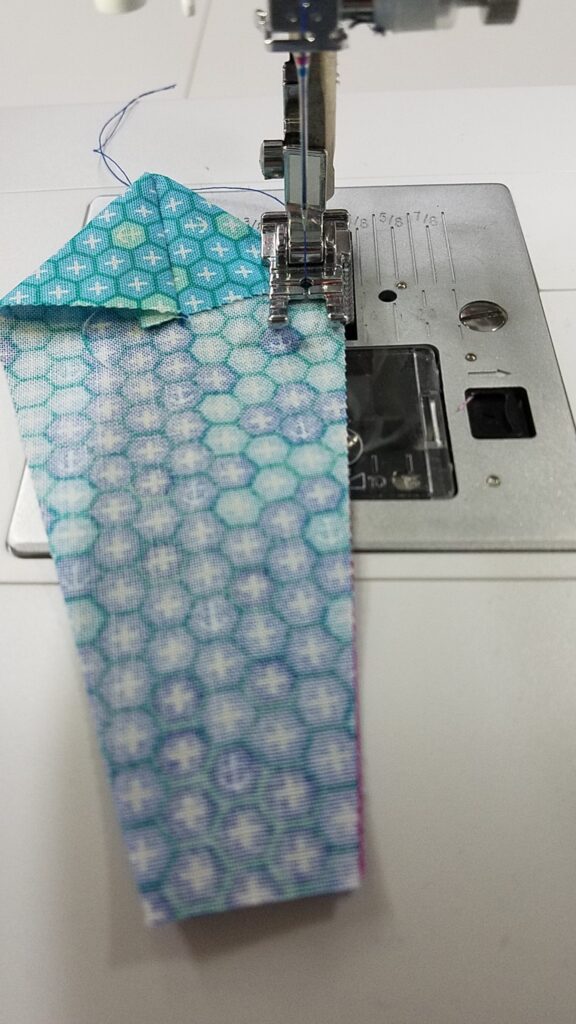
Fold a wedge in half longways right sides together. Sew a 1/4″ seam along the top (wide part) of the wedge where it is folded. Chain piece all the wedges in the same manner. Make 16 wedges.
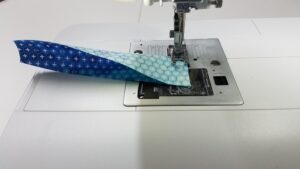
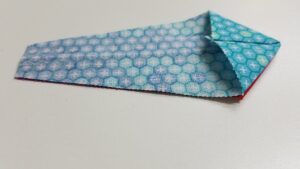
Trim the corner off the seam allowance at the fold. Press a gentle crease into the halfway fold.
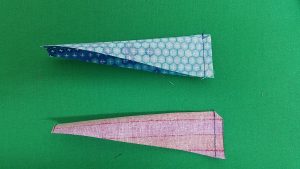
Turn the wedge right side out again and use a pointy tool to poke out the tip to a sharp point. Line up the seam to the creased fold running down the center of the wedge. Press to crease the point.
Repeat on all the wedges to create blades.

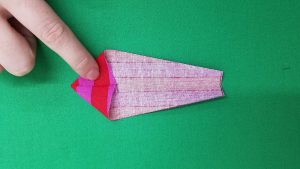
To sew the blades together, line up the folded point edge and the long sides. It’s okay if the short ends do not match perfectly because they will be covered later.
Then, begin sewing at least 1/4″ in from the folded edge.
Sew backwards over the folded edge and forwards again to secure.

Continue sewing down the blade to the end.
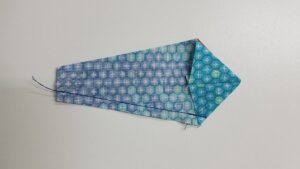
Matching the folded edges produces neat, matching Dresden Plate points. Do not press yet.
Dresden Plate Unit
Sew the blades in pairs, and then sew the pairs together to create quarters. Sew the quarters together to create halves, and finally, sew the halves together to complete the Dresden Plate unit.
Now you can press the Dresden Plate unit. Start by finger pressing and pushing the seams all in the same direction so they “spin” around the block. Finish with a press from the front to set everything in place.
Applique
Mark or press the 13″ gray (background) square in half and in half the other way to find the center. Line up the Dresden Plate unit to these guidelines and arrange until you are satisfied. Secure in place using your preferred method.

Roxanne Glue Baste-It is very helpful in securing Dresden Plates and all kinds of applique for stitching.
Then stitch the Dresden Plate unit to the background fabric using your preferred applique method.
Because the edge is finished, it is easy to get in some practice hand stitching without having to turn under any fabric. Or machine applique using some invisible thread. A buttonhole stitch by hand or by machine adds a lot of character and flair.
Circle
Use the template to cut out a circle.
If you wish to create a circle with a turned-under edge like the edge of the Dresden Plate, cut out around the outer circle and use the inner circle as your size guidance.
If you wish to create a circle with a raw edge and fuse applique it on, cut around the inner circle.
Use your preferred method to applique the circle to the center of the Dresden Plate unit, making sure to cover all the raw wedge ends.
Finishing Touches
Finally, trim evenly around the block so it measures 12 1/2″ x 12 1/2″ unfinished.
To prepare the block for quilt-as-you-go, sandwich the 12 1/2″ x 12 1/2″ backing square, 12″ x 12″ batting centered on the backing square, and your block. Baste using preferred method. Quilt as desired inside the 12″ finished size of the block. We’ll be sharing ideas for quilting the block later in the month.
And you’re all set!
Check back next week for some fun variations on the Dresden Plate block. You can always find links to all the previous Block 2019 blocks and see when the next installment is coming out in the main Block 2019 article, just click here.
As you finish your Dresden Plate blocks, share them in the AQS Project Parade Facebook group, or use the hashtag #Block2019 and tag us @aqsonline because we can’t wait to see what you do!
Can you put a backing fabric on to quilt as you go? If so, then how do you connect the blocks ?? I can see how to do one side, but I can’t figure how to get the back together with nice edges.
Thanks for the question, Holly! We’ll be covering the method more in depth later in the year as the project wraps up, but here’s a brief explanation for now.
In the method we’re using the top layer is sewn together (so no quilting off the edge), the batting is exactly 12″ so the batting squares just touch, and then the backing is overlapped with one side turned under which can then be sewn down by machine or hand.
If you prefer a different QAYG method, make any adjustments you would like! -Emily