[vc_row][vc_column][vc_column_text]
[/vc_column_text][/vc_column][/vc_row][vc_row][vc_column width=”1/2″][vc_column_text]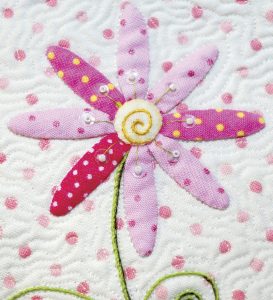 [/vc_column_text][/vc_column][vc_column width=”1/2″][vc_column_text]
Beads and Sequins
Beads and sequins can add incredible sparkle and a touch of additional interest to the surface of appliqué. They are completely washable and can endure some rough treatment. Just be careful to avoid the plastic beads that are found pre-packaged on the craft aisles. I prefer Japanese glass beads because the hole can accommodate a #10 sharps needle easily; they come in hundreds of colors, sizes, and types.
Sequins sometimes have a bad reputation for being less than elegant when used on the surface of a quilt, especially on traditional style quilts. I disagree. Today’s sequins come in popular fabric colors and can add additional interest and whimsy to a design. Play and have fun with embellishments on your quilts.
A caution for the uninitiated: dense application of these hypnotic shiny objects on the surface of a predominately appliquéd quilt is usually not a desirable outcome. Trust me on this. As with most embellishing, the details should be discovered upon closer inspection by the viewer.[/vc_column_text][/vc_column][/vc_row][vc_row][vc_column width=”1/3″][vc_column_text]
 [/vc_column_text][/vc_column][vc_column width=”2/3″][vc_column_text]
Adding Beads to Appliqué
I have switched to using a clear monofilament polyester thread to attach beads to my appliqué because it is strong enough to secure the beads, but is also invisible and blends with any color(s) of fabric I may use.
Why is this important? Typical beading threads are thick and are obvious to the eye.
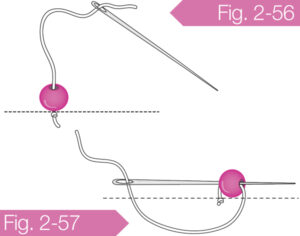
To attach a single bead to the surface, use a beading thread with a #10 sharps needle and come up from the back of your work through the center hole of the bead (Fig. 2–56).[/vc_column_text][/vc_column][/vc_row][vc_row][vc_column width=”2/3″][vc_column_text]
To make the bead sit on its side, take the needle to the back close beside the thread. This will make the bead turn on its side. Bring the needle back up through the bead again and then to the back once more; knot off (Fig. 2–57, page 42).
To make the bead lay flat, follow the previous step, except with your hand positioning the bead flat with the hole upward, take a stitch through to the back next to the outside edge of the bead, come back up through the center and back down on the opposite side. Knot off (Figs. 2–58 thru 2–60).[/vc_column_text][/vc_column][vc_column width=”1/3″][vc_column_text]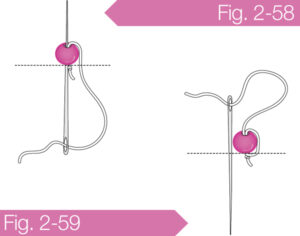
![]() [/vc_column_text][/vc_column][/vc_row]
[/vc_column_text][/vc_column][/vc_row]
0 Comments for “Beads & Sequins with Sandra Leichner”