Block 2019
February – Ohio Star Block

Welcome to Block 2019! We’re exploring classic quilt blocks all year, and the second block is Ohio Star. Here’s how to make it.
Fabric Requirements:
Gray — 3/8 yard
Aqua — Fat Eighth
Dark Blue — Fat Eighth
Coral — Fat Eighth
Batting — 12″ x 12″
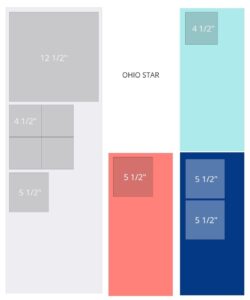
Cutting Instructions:
From the gray fabric, cut:
(1) 12 1/2″ x 12 1/2″
(4) 4 1/2″ x 4 1/2″
(1) 5 1/2″ x 5 1/2″
From the aqua fabric, cut:
(1) 4 1/2″ x 4 1/2″
From the dark blue fabric, cut:
(2) 5 1/2″ x 5 1/2″
From the coral fabric, cut:
(1) 5 1/2″ x 5 1/2″
Cutting Guide:
Assembly:
Quarter Square Triangles
Mark the backs of the coral 5 1/2″ squares in half diagonally once. Layer with a dark blue 5 1/2″ square, right sides together. Sew a 1/4″ on both sides of the marked line. Cut apart on the marked line to make two Half Square Triangles. Press seams toward the dark blue.

Repeat with the gray and dark blue 5 1/2″ squares.

Mark the backs of the dark blue/gray half square triangles from corner to corner crossing the seam. Layer a marked dark blue/gray half square triangle with a dark blue/coral half square triangle right sides together with dark blue triangles opposite each other. Sew a 1/4″ on both sides of the marked line. Cut apart on the marked line. Repeat with the remaining half square triangles. Trim to 4 1/2″ square. Make 4 Quarter Square Triangles.

Want to see this construction method in action?
Want help trimming a Quarter Square Triangle?
Top and Bottom Rows

Sew a gray 4 1/2″ square to the left and right sides of a Quarter Square Triangle unit. The gray squares should be sewn to the dark blue triangles as shown. Make 2. Row measures 4 1/2″ x 12 1/2″ unfinished.
Center Row

Sew a Quarter Square Triangle unit to the left and right sides of a 4 1/2″ aqua square. The coral triangles should be sewn to the aqua square as shown. Row measures 4 1/2″ x 12 1/2″ unfinished.
Block Assembly
Sew the rows together as shown. Block measures 12 1/2″ x 12 1/2″ unfinished.
To prepare the block for quilt-as-you-go, sandwich the 12 1/2″ x 12 1/2″ backing square, 12″ x 12″ batting centered on the backing square, and your block. Baste using preferred method. Quilt as desired inside the 12″ finished size of the block. We’ll be sharing ideas for quilting the block later in the month.
We’ve come up with a few tips and tricks for putting together your Ohio Star block. Let us know your tips in the comments!
And you’re all set! Check back next week for some fun variations on the Ohio Star Block, including inspiration from the quilt contest.
As you finish your blocks, share them in the AQS Project Parade Facebook group, or use the hashtag #Block2019 and tag us @aqsonline because we can’t wait to see what you do!
While I was cutting out the above blocks, I realized that maybe the instructions should state two 5.5 inch square for the dark blue material.
You are right and the mistake is now corrected. Thanks for letting us know! -Emily
Will you be sending some quilt as you go suggestions like you did with January? It is very helpful.
Thanks for your question, Patty! We sure will! The third Wednesday of each month will feature quilt-as-you-go suggestions for the block that month. This week we’re covering variations on Ohio Star. -Emily
When I try to print this it prints big black rectangles where the videos are. Is there a way to print without including the video blocks? (I don’t have FB.) Love these traditional blocks!
The Print Friendly feature allows you to delete anything you’d like by tapping/clicking on the picture or video.
I’m glad you’re enjoying the blocks! -Emily