At times, a well placed line of embroidery stitches can highlight the design on a quilt. A line of accent color along a border draws the eye. A subtle outline on an isolated motif highlights the theme. A simple line of stitches can do amazing things! So here are three embroidery stitches every quilter should have in their arsenal to use when a little magic is needed.
Follow the basic illustrations below to learn these three simple stitches.
Right Handed

Start with a stitch back, then bring the needle up where you want the next stitch to end. Notice the thread will always be in the middle of the of the bite the needle takes in the fabric. This creates a continuous line of stitches. Use a single strand for a subtle hit of a line or use 3 strands with a metallic thread twisted in for some zip!
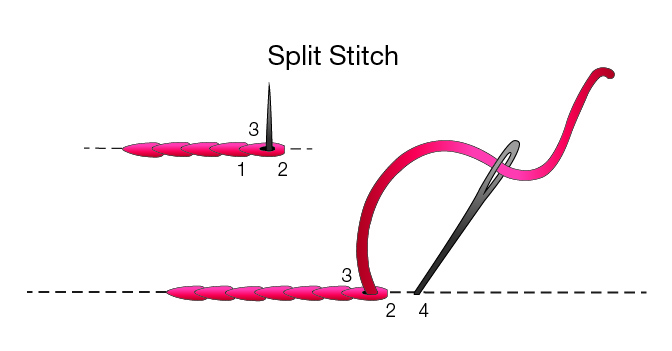
To make a split stitch, take one stitch back and bring the needle up in the middle of the stitch, splitting the floss or yarn. Take another stitch and come up splitting in the middle of that stitch, splitting it in half. The split stitch ends up creating a braided look so it’s great to use with six strands of floss or an even cluster of threads. Variegated thread makes quite a statement using this technique.
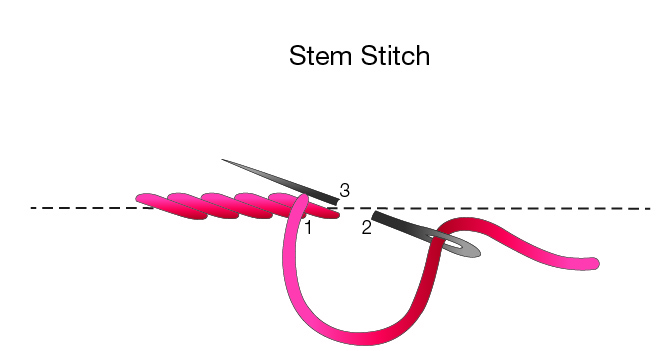
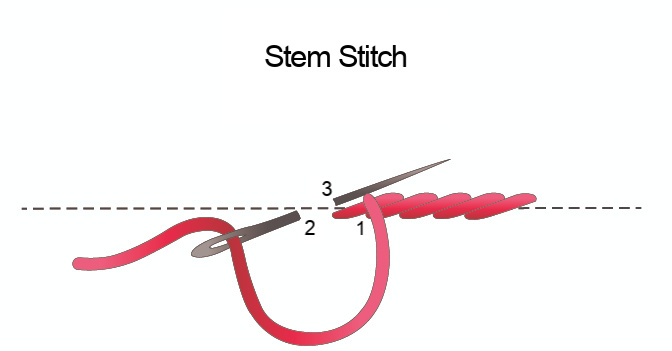
This classic stitch covers a line with a diagonal stitch. Take a diagonal stitch across the line bringing your needle up beside the middle of the stitch. Continue to stack the stitches in a line with them all laying side by side. The stem stitch offers more coverage so it is great to lay into a seam line of a border or accent the seam of a binding.
Grab a needle and some fun yarn or floss and start playing today!
Left Handed


Looking for more embroidery ideas? Click Here for Tutorials, Patterns & Over 1400 Ideas!
Show off your creations, connect with other quilters, and get inspired!
Join us in the AQS Project Parade Facebook Group and piece along with us!
Members get even more…
AQS Members can access hundreds of patterns and digital issues of American Quilter at any time!
Find quilt along series like Forever & A Day, 30 Days of Birds and more.
Not a member? Join today!
These are great, but how about the same stitches for left handers? All my life I have had to learn things backwards, or couldn’t join in the fun, because no-one knew how to teach me. For a knitting activity, I just ended up donating my supplies. We already get to sit in those horrible desks all through school.
Thanks for the question! The stitch instructions are written in direction-neutral language and we have photos of what all three of the stitches look like worked left-handed. If there’s anything else that would help you, please let us know and we’ll be happy to try to help. Thanks! -Emily
Thank you for this article. Small though it is, it has inspired me this morning. I now want to cancel all activities of the day, and just stitch!
I love embroidery on quilts. In fact Ihave embroidered 3 quilts for my children.
Thank you for showing how to do these stitches left-handed – but I do it differently. I hand-sew left to right – but I embroider right to left. I start on the right end of the line – my stem stitch slants the same direction as the right-handed diagram – and starts at #2 – then down at #3 – up at #1 (mid-way between #2 and #3) – down at #4 – a bit to the left of #3 – and back up in the middle of the last stitch – rinse and repeat – LOL. I have a page on my blog (A Left-Handed Quilter) – “LHQ – Hand Sewing” with some tutorials showing “How I Do It” – which may not be the same as other Left-Handed quilters – ;))